 Vidiyo
Go live
Broadcast from the Go live page in Vidiyo Studio: pick a camera, microphone, and destination channel, press GO LIVE, or schedule a premiere of a ready video.
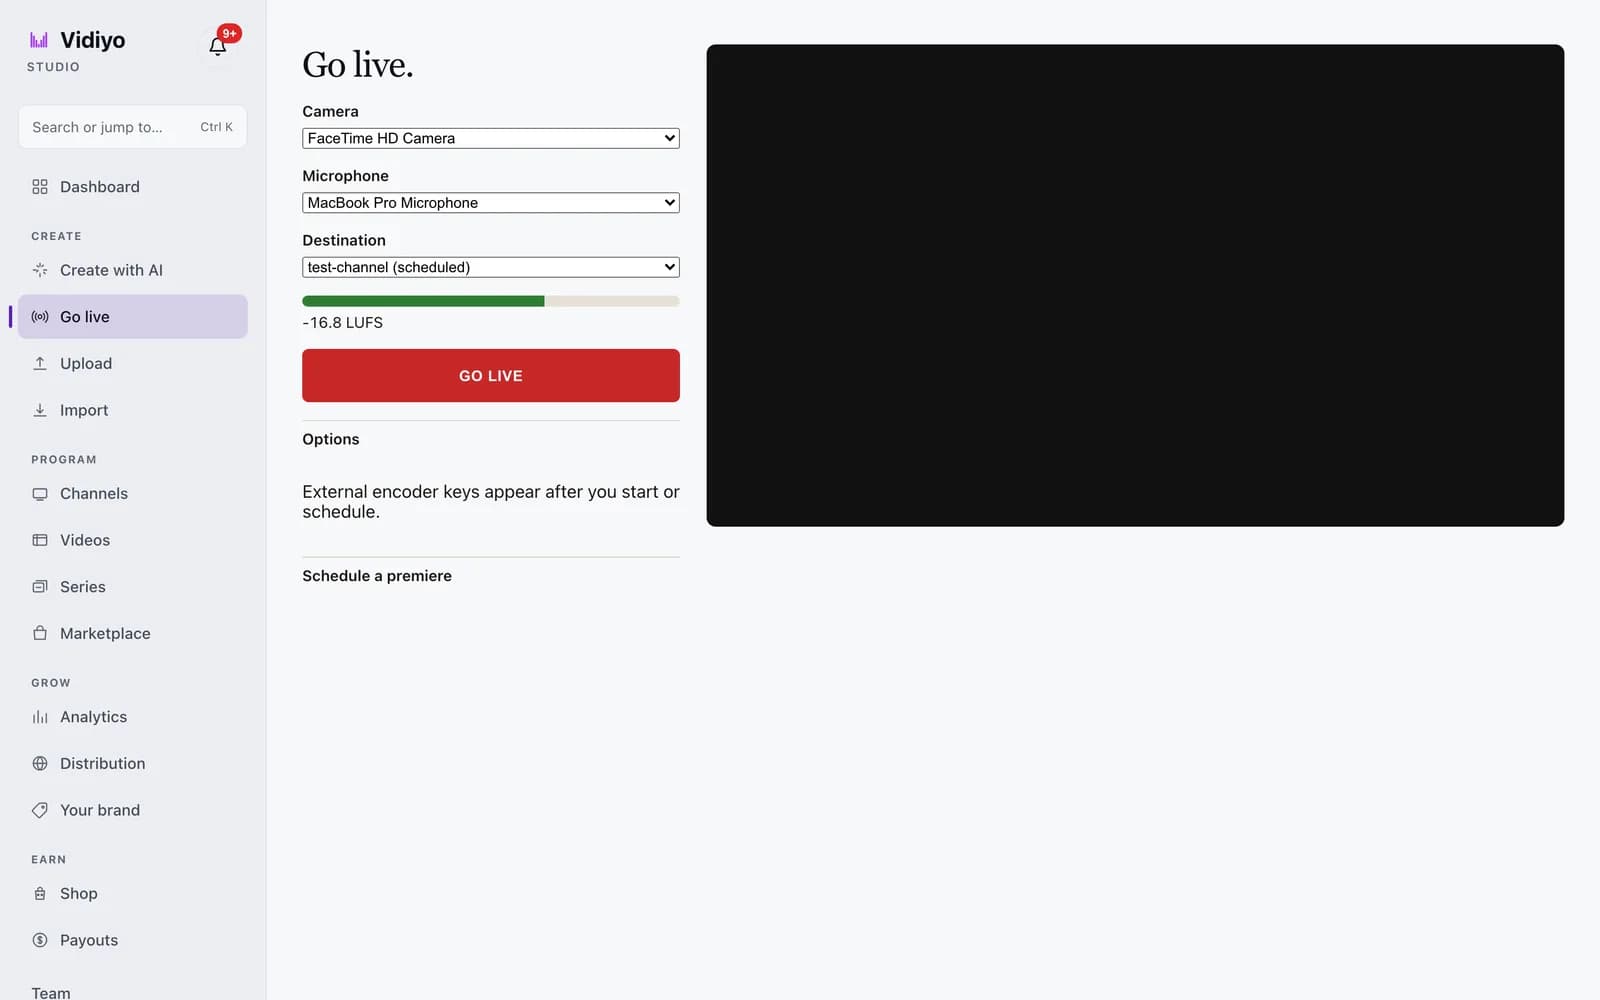
The Go live page at /studio/live is one screen for every kind of broadcast. Pick a camera and microphone, pick the channel the stream airs on, watch the loudness meter, and press GO LIVE. Your browser publishes the stream directly.
The same page hands out encoder keys for OBS or a hardware encoder, and it schedules premieres: a ready video that airs once at a set time as a live event. A phone stream, an RTMPS stream, and a premiere all start here.
Before you start
- You need a channel to air on. Destination lists your general-audience channels only. Adult-tier channels never appear. See Create a channel.
- Allow the browser to use your camera and microphone when it asks. If you decline, the preview stays black, but Destination and GO LIVE still work, so you can stream from an external encoder.
- Only one of your streams can be live at a time, and you can hold up to 5 scheduled broadcasts that have not started yet.
Steps
1. Open Go live and check your devices
In the Studio sidebar under Create, click Go live. The page title reads Go live. and the camera preview fills the right side once you allow access.
Camera and Microphone list every device your browser can see. Change either one and the preview follows. Under Destination, the loudness meter shows the level of the selected microphone in LUFS, the broadcast loudness unit. It reads No LUFS yet until sound arrives. Speak at your normal level and watch the bar move. The bar runs from -36 LUFS at empty to -6 LUFS at full, so a normal speaking voice lands near the middle.
2. Pick a destination
Destination lists the channels you own. A channel where you are an invited guest host shows (guest) after its name. When one of your channels has a scheduled stream whose window is open, the page selects that slot for you, so pressing GO LIVE starts the scheduled event rather than a new one.
3. Set the options
Click Options to expand the stream settings. None of them are required.
- Title: shown to viewers while you are live. Up to 200 characters.
- Visibility: Public streams appear in discovery. Private streams do not.
- Camera orientation: Landscape or Portrait. Portrait starts with the front camera on a phone.
- Chat mode: Open, Followers, Subscribers, or Off. Slow mode seconds limits how often one viewer can post, from 0 to 300. 0 turns slow mode off.
- Record this stream saves a recording after the broadcast ends. Once it is checked, Publish recording makes the recording visible when processing finishes, and Auto-schedule recording puts the finished recording back on the channel guide.
- Schedule for later: pick a date and time to announce the stream instead of starting now. The start must be in the future and at most 30 days out. A scheduled broadcast reserves a 1-hour window on the channel.
4. Press GO LIVE
Click GO LIVE. The button reads Starting… while Studio creates the stream, then your browser begins publishing from the selected camera and microphone. When the connection is up, the page shows stream health and latency, chat, and the Clip last 30 s, Clip last 60 s, and Clip last 2 min buttons under the preview. Each clip button marks that much of the broadcast; the cut lands in your library from the recording when the stream ends. See Cross-post clips for what to do with it.
Keep the tab open for the whole broadcast. Click End under the preview when you are done. If you set Schedule for later, GO LIVE books the event instead of starting it. Come back at the start time, confirm Destination points at the scheduled slot, and press GO LIVE again.
5. Stream from OBS or a hardware encoder
Before you start or schedule, the page reads External encoder keys appear after you start or schedule. Afterwards that line becomes a Use OBS / external encoder section. Open it to see Server (RTMPS), Stream key, and WHIP (browser encoders). The key is masked; click Show to reveal it and Hide to mask it again.
Paste the server and key into OBS under Settings, then Stream, and click Start Streaming there. You go live when the encoder connects. The stream key is shown only while this page is open, so copy it now.
6. Schedule a premiere
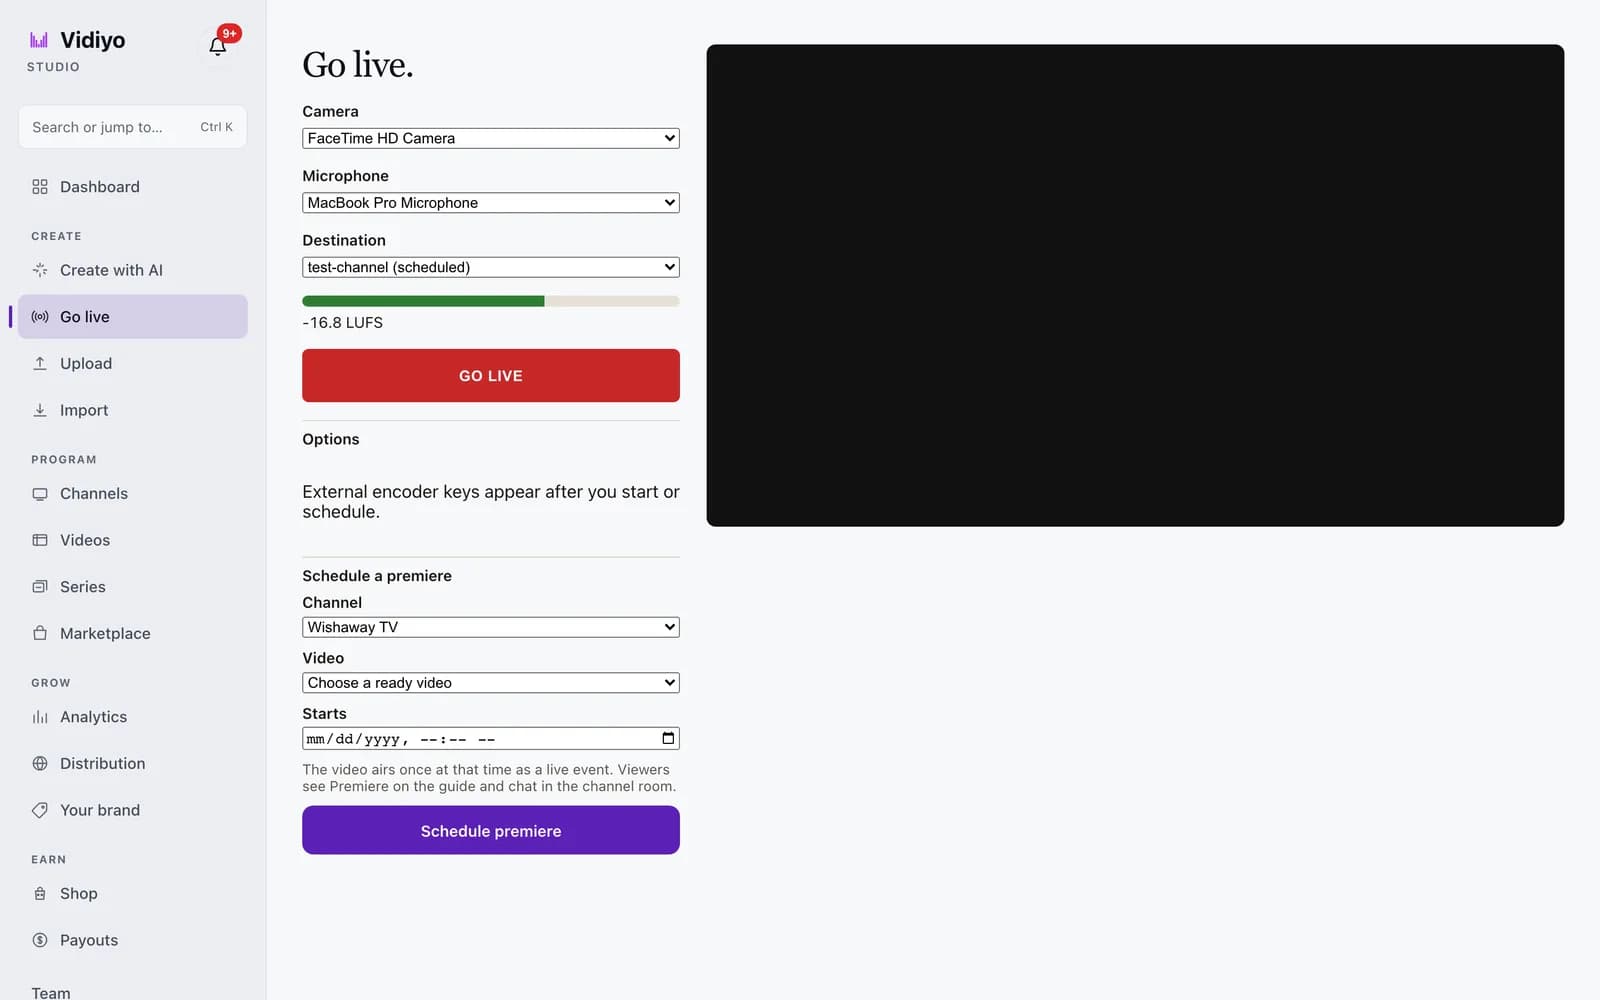
Under the encoder section, click Schedule a premiere. Premieres need a 24/7 channel; without one the section reads Premieres need a 24/7 channel. Create one under Channels.
Pick a Channel, then a Video from the Choose a ready video list. Only videos that have finished processing are listed. See Upload a video. Set Starts to a date and time in the future, up to 30 days out, then click Schedule premiere. Studio confirms with Premiere scheduled. If the slot is already taken on that channel's grid, Studio asks you to pick another time.
The video airs once at that time as a live event. Viewers see Premiere on the guide and chat in the channel room. Scheduled premieres are listed under Upcoming premieres, each with a Cancel button.
How a live stream reaches viewers
Your browser sends the stream over WHIP, or your encoder sends it over RTMPS, to Vidiyo's ingest. From there it is repackaged as HLS and plays on the channel page, in the TV guide, and in the TV apps like any other program.
When the stream airs on a channel, it takes the place of whatever the 24/7 grid had scheduled for that window. When you click End, the channel returns to its schedule. A scheduled broadcast holds a 1-hour window by default; the live service allows windows from 5 minutes to 4 hours.
Recording is off unless you check Record this stream. With it on, the recording lands in your library after the stream ends, and the two follow-up options decide whether it is published and whether it goes back onto the channel's schedule.
Tips
- Test the meter before you go live. A bar that never moves, or a label stuck on No LUFS yet, means the wrong microphone is selected.
- Schedule before you announce. A scheduled stream appears on the channel's guide row ahead of time, and the page preselects the slot when you return.
- Copy the stream key the moment it appears. Closing the page discards it, and you cannot get the same key back.
- Mark highlights while you are live with the Clip last buttons. The cuts are made from the recording after the stream ends. Short clips reach a different audience than the full broadcast.
- Prefer a timed partner feed on the grid instead of a live camera? Use Schedule a live stream on the channel's Schedule tab.
Quick answers
Do I have to stream from my browser?
No. Press GO LIVE, then open Use OBS / external encoder. Paste Server (RTMPS) and the Stream key into OBS under Settings, then Stream, and start streaming there. Browser-based encoders can use the WHIP (browser encoders) URL instead.
Why does the page say live is not available?
The notice Live isn't available right now. Your settings are still here. Try again in a moment. means the live service is not reachable. Your camera, microphone, destination, and options are kept. Wait a moment and press GO LIVE again.
Can I run two streams at once?
No. One of your streams can be live at a time. You can have up to 5 scheduled broadcasts waiting to start, each set at most 30 days ahead.
Where do the encoder keys go when I close the page?
They are shown only while the Go live page is open. If you close it, start or schedule a new stream to get a fresh set of keys.
What is the difference between a premiere and a scheduled stream?
A scheduled stream is a live broadcast you start yourself at the booked time, from a camera or an encoder. A premiere is a ready video from your library that airs once at the set time with no camera involved. Both show on the channel's guide and both open chat in the channel room.
Open Studio
Upload a video, go live, or program your channel. Studio is free, and every guide here walks you through one task.